LED Christmas lights
One of the bummers of Christmas is trying to get the strings of lights
to work. The biggest culprit are the strings that are connected in series.
These are usually the strings of so-called miniature Christmas lights with
the push-in bulbs. You've probably read on the box that when one light
goes out the rest stay lit. True, the light bulbs have an internal
"shunting device" so that if one burns out, it doesn't break the circuit
and the rest of the lights do stay lit. But the problem is that if the
circuit should become broken at any other point, the whole string goes
out. The usual place this happens is between the lamp and the socket, especially
if the string is used outdoors. This is because water in the socket causes
the thin copper lamp wires to oxidize, which prevents them from conducting
electricity. Sometimes the wires on the lamp can become completely
eaten away. At any rate, it breaks the circuit and the string doesn't work.
Finding the broken connection is no easy matter, especially when you
consider that most strings have at least 35 lamps. I've seen every trick
in the book used to get a bad string to work, using an ohmmeter to find
the bad connection, even running a high voltage through the string which
causes an arch to form at the point of the broken connection. To make matters
worse, there's usually more than one broken connection. Whatever method
is used can be time consuming. You may be wondering, if series strings
are such a hassle, why don't they run the lamps in parallel, like they
do with the strings that use 120 volt light bulbs.
Many of you are probably not old enough to remember the so-called transformer
light strings of the 50's. They were usually strings of low voltage blinking
lights that had to be run in parallel, because when each light blinked,
it would break the circuit. The transformer was about the size of
the type that ran model electric trains (probably made by the same transformer
company), except it was a fixed voltage (I think 6 volts) and was probably
about 10 amps. When lamps are in parallel, the current adds up, so it took
a pretty hefty transformer to run the lamps, which added to the cost of
the string. Because of the high current, the wire size of the string also
had to be a heaver gauge. This is probably the main reason they don't make
these strings anymore. The miniature strings of lights could be made with
24AWG wire and no transformer.
Enter the light emitting diode. Although they've been around since the
late sixties, it has only been in recent years that they have become suitable
for Christmas light strings. The first problem was the lack of colors, red was
all you could get. By the mid-70s, you could get three colors, red, yellow and
green, but the color shades weren't that great and lack of briteness was another
problem.
By the 1990s, all these problems had been eliminated, and LEDs looked as good
as miniature Christmas lights, and also had a lot of advantages. They use about a tenth of the current of normal
miniature Christmas light bulbs, they have a life of 100,000 hours, they
have much thicker wires than miniature Christmas light bulbs and they now
come in all the colors of the rainbow and are much brighter than LEDs were
only a few years ago, and you can even buy LEDs that blink.
Here's the two lamps in a side by side comparison, the lamp on the left
is a conventional miniature Christmas light. Between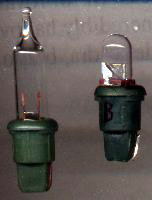 the two wire supports is the filament that gives off the light. The lamp
on the right is the light emitting diode. It is made out of plastic instead
of glass and it is not hollow. That makes them virtually unbreakable. The
metal substrate holds the semiconductor material that gives off the light.
They generate very little heat. Both lamps are mounted in the plugs that
fit the miniature Christmas lamp sockets. Unlike regular incandescent lamps,
LEDs don't have to be colored to produce colored light. It's the semiconductor
material that determines the color of the lamp. Since making this material
produce more than a narrow wavelength of light is difficult, white LEDs
are produced to generate ultraviolet light, which causes a phosphor coating
to glow, much like a fluorescent lamp, only without any poisonous mercury.
the two wire supports is the filament that gives off the light. The lamp
on the right is the light emitting diode. It is made out of plastic instead
of glass and it is not hollow. That makes them virtually unbreakable. The
metal substrate holds the semiconductor material that gives off the light.
They generate very little heat. Both lamps are mounted in the plugs that
fit the miniature Christmas lamp sockets. Unlike regular incandescent lamps,
LEDs don't have to be colored to produce colored light. It's the semiconductor
material that determines the color of the lamp. Since making this material
produce more than a narrow wavelength of light is difficult, white LEDs
are produced to generate ultraviolet light, which causes a phosphor coating
to glow, much like a fluorescent lamp, only without any poisonous mercury.
Converting an old miniature light string to work with LEDs is fairly
easy for anyone who knows how to soldier. It is also a good project to
learn how to soldier for those who don't, but you should practice on scrap
wire first, before trying to build the string. It involves cutting a series
string apart and rewiring it in parallel, with a series resistor for each
of the LEDs, which limits the current of each LED to 20ma. This usually
works out to be 470 ohms for a 12 volt power supply. Below are the
power supply requirements according to the numbers of LEDs in the string for a
LED current of 20 mA.
| LEDs in string |
Power supply current: |
| 10 |
200 mA |
| 20 |
400 mA |
| 25 |
500 mA |
| 30 |
600 mA |
| 40 |
800 mA |
| 50 |
1 A |
| 100 |
2 A |
I begin by cutting the light sockets off the string about three inches
from the socket and I store them in a box. There is usually a wire that
goes from one end of the string to the other (two such wires if you're
lucky to have a string that has an electrical socket at the end of the
string), which I wind onto a spool. Sometimes you can find wire the right
shade of green wire at electronics stores. I find that 22AWG size stranded
wire (make sure it is not solid) works the best. Also get some 1/8th inch
heat shrink tubing to insulate your connections. It usually comes in four
foot lengths. It may take two of these lengths to do an entire string.
You will also need a heat source to shrink the tubing. If you don't have
a heat gun, a lighter can be used if you are careful.
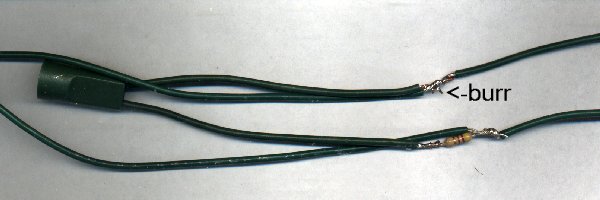
After you get the string cut apart, you should strip about a half-inch
of insulation off the socket wires and soldier a 470 ohm resistor to one
of the two wires. It should look like this. The color code for a 470 ohm
resistor is Yellow,
Violet,
Brown.

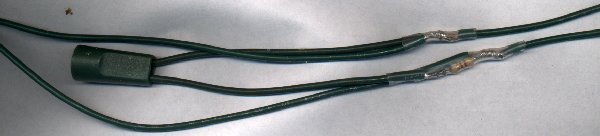
To build the string, I cut the green wire into 7 inch lengths. When
soldiered, that gives about a 6 inch spacing between sockets, close to
that of the original string. When the 7 inch wires are attached, it looks
like this:
Two of the four wires go to the previous lamp in the string (or to the
power supply if it's the first lamp in the string) and the other two wires
go to the next lamp in the string. Since LEDs are polarized, (electrons
will only flow through them in one direction because they're diodes) you
should wire the string so that all the resistors are in the same line (I
choose +). That makes things easier when plugging the LEDs into the string.
Although LEDs can operate on AC, I have misgivings in doing so and prefer
to operate them on filtered DC. For one thing, it protects the LEDs from
power surges, because the filter capacitors in the power supply tend to
filter out any spikes on the AC line.
The next step is to cover the connections with heat shrink tubing and
to shrink it with your heat source. Before you do this, you should smooth
out any sharp burrs (such as can be seen on the top wire above) in the
connections with needle nose pliers. Otherwise they could poke through
the heat shrink tubing. This wiring process is repeated for each lamp socket
in the string. Now for a look at the finished connection:
Notice how much nicer the connections are than if you were to cover
them with electrical tape. You don't have to worry about the tape peeling
off. The heat shrink tubing is there to stay. After shrinking the tubing
over the connection, the two wires between the sockets is twisted together
just like is done with a normal string of Christmas lights.
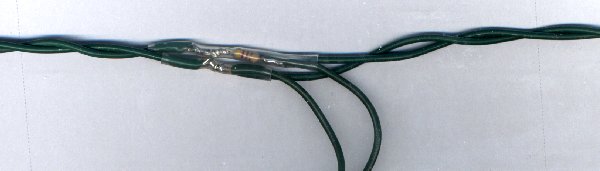
Now it's starting to look like a light string. The two wires heading
down go to the light socket (not shown).
Neon light strings
You can also construct line voltage strings that will work with neon
indicator lamps, often known as NE-2. Like the miniature Christmas lights,
these lamps have wire leads and fit the same sockets. The only change you
have to make in the string construction is to use 100k series resistors
rather than the 470 ohm ones required for LEDs. Also, you can get green
"neon" lamps the same size of the orange ones. These are actually argon
glow lamps with a fluorescent coating that glows green from the ultraviolet
light that the argon discharge produces. You used to be able to get the
argon lamps without the fluorescent coating, but I don't think they make
them anymore. These argon lamps may need a different resistor value than
the neons.
Light chaser strings
Instead of having two wires, these strings have five, one for each circuit
and a common return wire. I refer to this common wire as the backbone of
the string, since it is the only wire that connects to every socket. One wire from each socket connects to the return
wire through the resistor, and the other socket wire connects to one of
the four circuit wires, the first socket in the string to circuit 1, the next to
circuit 2, and so on. I use 5-pin DIN connectors to connect the string to the
chase controller.
[return to the electronics index]
Copyright © 2002, Colin Pringle (colin@wild-bohemian.com)
The mail link automatically fills in the subject field so I will know
which page you're commenting on.
All rights reserved
electronics/led_lights.htm